TrackerGuru User Guide
TrackerGuru is a keyboard-focused desktop app for property agents to efficiently manage their contacts. It is designed for users who want to complete contact management tasks faster than conventional point-and-click tools.
Target users and assumptions:
- Property agents who need to manage various contact types involved in their deals such as buyers, sellers or other stakeholders.
- Users are assumed to be comfortable typing fast.
- No prior knowledge of programming or Java is required, except following download instructions.
- If you are unfamiliar with Command Formats, we suggest reading our Command Format Notes here
Quick start
In this section, you’ll learn how to install TrackerGuru, run your first command and get familiar with the interface.
Step 1: Check Java version
TrackerGuru requires Java 17 or above installed on your computer. (See our FAQ: Section for instructions on how to check your Java version)
Step 2: Download the app
Download the latest TrackerGuru .jar file from the releases page on Github.
Step 3: Create your app's home folder
Move the .jar file into any folder on your device. This will be your home folder.
Step 4: Run the app
- Open a command terminal.
cd /path/to/your/home/folder - Run the app.
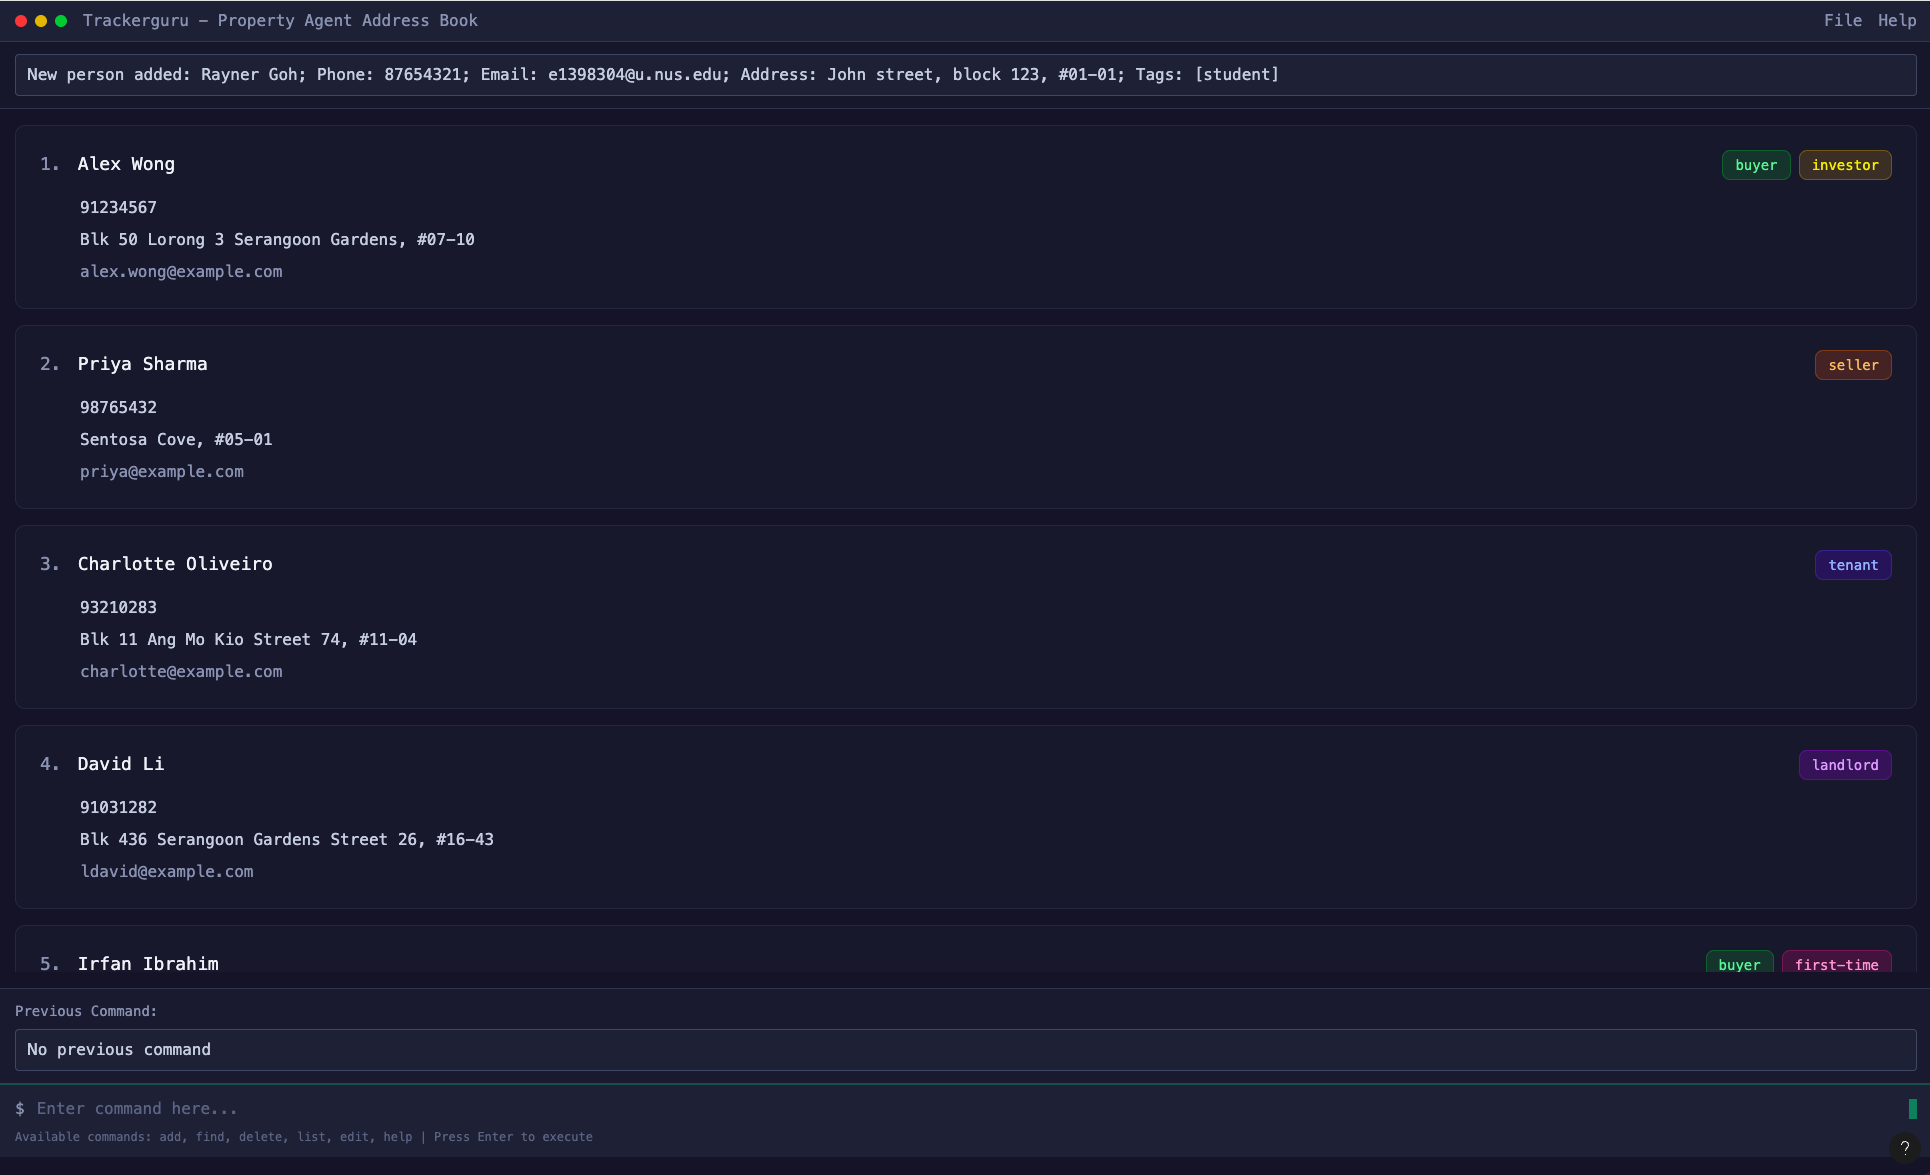
java -jar trackerguru.jar - A GUI like this should appear in a few seconds with sample data
Step 5: Try basic commands
In the command box, try any of the following commands. Press Enter to execute.
| Command | You Should Expect To |
|---|---|
add n/John Doe p/98765432 e/johnd@example.com a/John street, block 123, #01-01 | Add a contact John Doe with his specified fields |
list | List all contacts |
delete 3 | Delete the 3rd contact displayed. |
clear | Delete all contacts in TrackerGuru ⚠️: This action is irreversible! |
exit | Exit the TrackerGuru application |
Refer to the Features: Section below for more details and commands
Step 6: Help Guide
To access this User Guide anytime from the app, use the help command.
Features
In this section, you’ll explore how to add, update and organise your contacts using TrackerGuru’s contact management commands.
Before proceeding with the commands in this section, please take a moment to review the notes below to understand the usage of command parameters and symbols, as well as understand how roles, tags and tag groups can be effectively utilised for contact organisation.
Command Format Notes
Parameters:
UPPER_CASEwords should be supplied by the user.
e.g.add n/NAME: replaceNAMEwith an actual name such asadd n/John Doe.Optional fields: Items in
[square brackets]are optional.
e.gn/NAME [t/TAG]: bothn/John Doe t/friendandn/John Doeare acceptable.Repeatable fields: Items followed by
…can be repeated any number of times, including zero.
e.g.[t/TAG]…: valid usages aret/friend,t/friend t/familyetc.Flexible order: Parameters can appear in any order.
e.g. bothn/NAME p/PHONE_NUMBERandp/PHONE_NUMBER n/NAMEare acceptable.Commands without parameters:
help,list,exit,clear... will ignore any additional input.
e.g.help 123is interpreted ashelp.
Understanding Roles
Each contact in TrackerGuru can have one or more roles that describe their professional relationship or purpose to you:
Why use Roles?
- Better segmentation: Classify contacts easily by their professional relationship
- Easier filtering: For example, use
filter r/Landlord r/Tenantto find all landlords or tenants - Flexible categorization: A single contact can play multiple roles (e.g. Buyer and Lawyer)
Example Contact with Roles:
add n/John Tan p/91234567 e/john@example.com a/Blk 456 Bishan r/Buyer r/Lawyer
Understanding Tags and Tag Groups
TrackerGuru supports two ways to tag your contacts:
Simple Tags: Basic labels without categories
- Example:
t/vip,t/priority,t/urgent
- Example:
Tags with Groups (recommended for organization): Tags organized into categories
- Format:
t/GROUP.VALUE - Example:
t/propertyType.HDB,t/location.Bishan,t/priceRange.500k-1M
- Format:
Why use Tag Groups?
- Better organization: Group related tags together (all property types, all locations, etc.)
- Easier filtering: For example, use
filter tg/propertyTypeto find all contacts with any property type tag - Clearer contact management: Instantly see which category each tag belongs to
Example Contact with Tag Groups:
add n/John Tan p/91234567 e/john@example.com a/Blk 456 Bishan r/Buyer t/propertyType.HDB t/location.Bishan t/priceRange.500k-1M t/priority
In this example:
propertyType.HDB- Tag with group (property type is HDB)location.Bishan- Tag with group (location is Bishan)priceRange.500k-1M- Tag with group (price range is 500k-1M)priority- Simple tag without group
Note:
Tag VALUES (the part after the dot) can contain symbols like hyphens (-), underscores (_), and dots (.) for more flexible categorization.
However, it has to start with alphanumeric, and can contain any combination after. For example, t/price.1.5M-2M is valid, but t/price.-2M is not.
Adding a person: add
Command: add n/NAME p/PHONE_NUMBER e/EMAIL a/ADDRESS [r/ROLE]… [s/STATUS] [t/TAG]…
Adds a person (see definition) to the address book.
Note:
Each person must have a unique
PHONE_NUMBERandEMAIL.Role is optional. You can add multiple roles by repeating
r/ROLEbut a contact made with duplicate roles will throw an error message. See Role in the glossary for more details.
Example:r/Buyer r/Investoris acceptable,r/Buyer r/buyeris unacceptable.Status is optional. If provided, it must be
PendingorCompleted(case-insensitive). Each person can have only one status. See Status in the glossary for more details.Tags are optional. See Tag in the glossary for more details. It can be formatted as either:
t/GROUP.VALUE: bothGROUPandVALUEare alphanumerict/TAG: a single alphanumeric tag
Examples:
add n/John Doe p/98765432 e/johnd@example.com a/John street, block 123, #01-01add n/Betsy Crowe p/12345678 e/betsycrowe@example.com a/Betsy street, block 123 r/Seller s/Completed t/friendadd n/Alex Tan p/87654321 e/alex@example.com a/Blk 456 r/Buyer r/Investor s/Pending
Editing a person : edit
Command: edit INDEX [n/NAME] [p/PHONE] [e/EMAIL] [a/ADDRESS] [r/ROLE]… [s/STATUS] [t/TAG]…
Edits an existing person in the address book.
General:
- Edit the person at the specified
INDEX.INDEXrefers to the number shown beside each person in the displayed list.INDEXmust be a positive integer 1, 2, 3, …
- At least one optional field must be provided for the edit to take effect.
- The person's
name,phone,email, andaddresswill be replaced with the new values you enter.
Tips:
- To remove all roles: type
r/ONLY without any value. - To remove all tags: type
t/ONLY without any value. - To remove the status: type
s/ONLY without any value. name,phone,email, andaddressmust always contain a value.
Caution:
- Editing roles replace all existing roles: roles are not cumulative.
- You can specify multiple new roles using multiple
r/prefixes (e.g.r/Buyer r/Investor).
- You can specify multiple new roles using multiple
- Editing tags replaces all existing tags: tags are not cumulative.
- You can specify multiple tags using multiple
/tprefixes (e.g.t/priority t/property.HDB).
- You can specify multiple tags using multiple
- Editing status replaces the existing one.
- Status must be either Pending or Completed (case-insensitive).
Examples:
edit 1 p/91234567 e/johndoe@example.comEdits the phone number and email address of the 1st person to be91234567andjohndoe@example.comrespectively.edit 1 s/CompletedEdits the status of the 1st person toCompleted. If the person did not have a status, it will be added.edit 2 n/Betsy Crower t/Edits the name of the 2nd person to beBetsy Crowerand clears all existing tags.edit 3 r/Buyer r/LandlordReplaces all existing roles of the 3rd person withBuyerandLandlord.edit 4 s/Removes the status from the 4th person.
Finding persons by name: find
Command: find KEYWORD [MORE_KEYWORDS]…
Finds persons whose names contain any of the provided keywords.
- The search is case-insensitive (e.g
hanswill matchHans). - The order of the keywords does not matter (e.g.
Hans Bowill matchBo Hans). - Only the name field is searched.
- Only full words will be matched (e.g.
Handoes not matchHans). - Persons matching at least one keyword will be returned (i.e.
ORsearch).- e.g.
Hans Bowill returnHans Gruber,Bo Yang
- e.g.
Examples:
find JohnreturnsjohnandJohn Doefind alex davidreturnsAlex Yeoh,David Li
Filtering persons by Role, Status, Tag Group: filter
Command: filter [r/ROLE]… [s/STATUS]… [tg/TAG_GROUP]…
Filters the current list for persons matching the specified parameters.
- The filtering of Roles, Statuses and Tag Groups are case-insensitive.
- e.g.
r/buyerwill matchr/Buyer
- e.g.
- You can filter with any combination of: Role(s), Status(es), TagGroup(s)
- You may specify multiple Roles, Statuses, and Tag Groups
- At least one optional field must be provided
- A person will be shown if they match any of the specified parameters
Examples:
filter r/buyerreturns all persons with the role buyerfilter s/pending s/completedreturns all persons whose status is pending or completedfilter r/buyer s/completed tg/pricereturns all persons who are buyers, or whose status is completed, or has a tag whose Tag Group is price
Deleting a person : delete
Command: delete INDEX
Deletes the specified person from the address book.
- Deletes the person at the specified
INDEX. - The index refers to the index number shown in the displayed person list.
- The index must be a positive integer 1, 2, 3, …
Examples:
listfollowed bydelete 2deletes the 2nd person in the address book.find Betsyfollowed bydelete 1deletes the 1st person in the results of thefindcommand.
Listing all persons : list
Command: list
Shows a list of all persons in the address book.
Creating a Tag Group : tg
Command: tg GROUP_NAME
Creates a new Tag Group to organize your tags into categories.
Notes:
GROUP_NAMEmust be alphanumeric (letters and numbers only, no spaces or special characters).- Tag Group names are case-sensitive (e.g.,
PropertyTypeandpropertytypeare different). - Duplicate Tag Group names are not allowed. If the Tag Group already exists, an error message will be shown.
- Once created, you can use the Tag Group when adding or editing contacts using the format
t/GROUP.VALUE.
Examples:
tg propertyTypecreates a Tag Group calledpropertyType.tg locationcreates a Tag Group calledlocation.tg priceRangecreates a Tag Group calledpriceRange.
After creating a Tag Group, you can assign tags within that group to contacts:
add n/John Doe p/98765432 e/john@example.com a/123 Street t/propertyType.HDB t/location.Bishanedit 1 t/propertyType.Condo t/priceRange.500k-1M
Deleting a Tag Group : dtg
Command: dtg GROUP_NAME
Deletes an existing Tag Group.
Important:
- You cannot delete a Tag Group if it is currently in use by any contact's tags.
- To delete a Tag Group that's in use, you must first:
- Remove all tags using that group from your contacts (using the
editcommand), OR - Delete the contacts that have tags in that group.
- Remove all tags using that group from your contacts (using the
- Tag Group names are case-sensitive.
Examples:
dtg propertyTypedeletes thepropertyTypeTag Group (only if not in use).dtg locationdeletes thelocationTag Group (only if not in use).
Error scenarios:
- Tag Group does not exist:
The Tag Group propertyType does not exist. - Tag Group in use:
This Tag Group is currently in use and cannot be deleted. Please remove all tags associated with this group first.
Tip: Use the tg command to list all your Tag Groups before attempting to delete one!
Listing all Tag Groups : tg
Command: tg
Lists all Tag Groups you have created.
Notes:
- If no Tag Groups have been created yet, a message will inform you that no Tag Groups exist.
- This command helps you check which Tag Groups are available before assigning tags to contacts.
- Tag Groups persist across sessions and are automatically saved.
Examples:
tgdisplays all existing Tag Groups such aspropertyType,location,price, etc.
Viewing status statistics : stats
Command: stats
Displays statistics about the status distribution of all contacts in your address book.
- Shows the count of contacts for each status category:
- Pending: Contacts with pending status
- Completed: Contacts with completed status
- No Status: Contacts without any status
- Also displays the total number of contacts
Example output:
Status Statistics:
- Pending: 45 contact(s)
- Completed: 23 contact(s)
- No Status: 12 contact(s)
Total: 80 contact(s)
Tip: Use this command to quickly see how many contacts are pending, completed, or have no status assigned!
Clearing all entries : clear
Command: clear
Removes all entries from the address book.
When you run this command, the application will ask for confirmation before proceeding.
You must type: y or Y to confirm and clear all entries, or n or N to cancel the action.
If you enter any other input on accident, the program will continue prompting until a valid response is provided.
Note:
- The confirmation is case-insensitive (
y,Y,n, orNare all valid) - The clear command does not delete individual fields or contacts selectively
- It removes all data from the address book once confirmed
Exiting the program : exit
Command: exit
Exits the program.
Getting help : help
Command: help
Opens the following help window, which will direct you to this exact User Guide.

Saving the data
TrackerGuru data are saved in the hard disk automatically after any command that changes the data. There is no need to save manually.
Editing the data file
TrackerGuru data are saved automatically as a JSON file [JAR file location]/data/addressbook.json. Advanced users are welcome to update data directly by editing that data file.
Caution: All or Nothing Strategy
If your changes to the data file invalidate its format, TrackerGuru will currently ignore all existing data and display an empty data file at the next run instead. Hence, it is recommended to save a backup of the file before editing it.
Furthermore, certain edits can cause the TrackerGuru to behave in unexpected ways (e.g. if a value entered is outside the acceptable range). Therefore, edit the data file only if you are confident that you can update it correctly.
Note: The existing JSON file on disk will not be overwritten unless you run commands in TrackerGuru, so you must close the TrackerGuru application window to prevent any loss to your data.
FAQ
Q: How do I check my Java version?
A: To verify your Java version:
- Open a terminal and enter
java -version - You should see an output similar to:
java version "17.0.x" // or any higher version Java(TM) SE Runtime Environment (build 17.0.x+xx) Java HotSpot(TM) 64-Bit Server VM (build 17.0.x+xx, mixed mode, sharing) - If the command is not recognised or the version is less than 17: Follow this guide for installation.
- After installation, type
java -versionto verify the correct version.
Q: How do I transfer my data to another Computer?
A: Follow the Quick Start: Section to install the app on the new computer. Then, locate the new TrackerGuru home folder and replace its data folder with the data folder from your old computer.
Known issues
- When using multiple screens, if you move the application to a secondary screen, and later switch to using only the primary screen, the GUI will open off-screen. The remedy is to delete the
preferences.jsonfile (in the same directory as the JAR file) created by the application before running the application again. - If you minimize the Help Window and then run the
helpcommand (or use theHelpmenu, or the keyboard shortcutF1) again, the original Help Window will remain minimized, and no new Help Window will appear. The remedy is to manually restore the minimized Help Window.
Command summary
| Action | Format, Examples |
|---|---|
| Add | add n/NAME p/PHONE_NUMBER e/EMAIL a/ADDRESS [r/ROLE]… [s/STATUS] [t/TAG] [t/GROUP.VALUE]… e.g. add n/James Ho p/22224444 e/jamesho@example.com a/123, Clementi Rd, 1234665 r/Buyer r/Investor s/Pending t/priority t/propertyType.HDB |
| Clear | clear |
| Delete | delete INDEXe.g. delete 3 |
| Edit | edit INDEX [n/NAME] [p/PHONE_NUMBER] [e/EMAIL] [a/ADDRESS] [r/ROLE]… [s/STATUS] [t/TAG] [t/GROUP.VALUE]…e.g. edit 2 n/James Lee e/jameslee@example.com s/Completed |
| Filter | filter [r/ROLE]… [s/STATUS]… [tg/TAG_GROUP]…e.g. filter r/buyer s/pending tg/price |
| Find | find KEYWORD [MORE_KEYWORDS]e.g. find James Jake |
| Create Tag Group | tg GROUP e.g. tg PropertyType |
| Delete Tag Group | dtg GROUP e.g. dtg PropertyType |
| List Tag Groups | tg |
| List | list |
| Stats | stats |
| Help | help |
Glossary
Java
Java is a programming platform used to run applications like TrackerGuru. TrackerGuru requires Java 17 or above.
GUI
GUI Stands for Graphical User Interface. It is the visual part of TrackerGuru that you interact with using windows, buttons, and text fields and displays all your contacts.
Person
A Person represents an individual contact entry in TrackerGuru. Each person stores key information used by property agents to manage and categorize clients.
Fields:
- Name (
n/) – The full name of the contact. - Phone (
p/) – The contact’s phone number. - Email (
e/) – The contact’s email address. - Address (
a/) – The contact’s physical address.
Optional Fields:
- Role (
r/) – See definition of Role. - Status (
s/) – See definition of Status. - Tag (
t/) – See definition of Tag.
Each Person is uniquely identified by their Phone or Email. Multiple optional fields (Role, Status, Tag) allow you to flexibly organize your contacts according to your workflow.
Role
A Role represents the professional relationship of a contact in your address book.
Each contact can have multiple roles but cannot have duplicate roles.
Common roles include:
- Buyer: Someone looking to purchase property
- Seller: Someone looking to sell property
- Landlord: Property owner who rents out properties
- Tenant: Someone looking to rent property
- Investor: Someone interested in property investment
- etc
Case-insensitivity:
buyer, Buyer, and BUYER are treated as the same role.
Using both r/buyer and r/BUYER in a command will result in a duplicate role error.
Format rules:
- Roles may include letters, numbers, spaces, hyphens
-, and underscores_. - Roles cannot start with a hyphen or underscore.
- Roles cannot be blank.
Status
A Status tracks the progress or state of your interaction with a contact. Each contact can have only one status (or none).
Valid status values:
- Pending: Initial contact or ongoing negotiation
- Completed: Transaction successfully finished
Status values are case-insensitive (e.g., "pending", "Pending", and "PENDING" are all valid). Only these two values are allowed.
Tag
A Tag is an optional label used to provide additional information about a contact. A Tag can also optionally contain a Tag Group (see definition), allowing it to be categorised under a specific group.
Note:
- TrackerGuru must already contain the tag group for a tag to be assigned under said group.
Common tags include:
- VIP: High-priority or important contact
- Follow-up: Contact that requires a follow-up
- HotLead: Contact with immediate potential
Tags are case-sensitive (e.g., "VIP" and "vip" are treated as different tags).
Tag Group
A Tag Group organizes tags into broader categories for more structured classification. It is a way to group related tags under a shared category.
How it works:
- Tag Groups are created using the
tg GROUP_NAMEcommand. - Once created, you can assign tags within that group using the format
t/GROUP.VALUE. - Tag Groups allow you to categorize tags into logical categories.
Common Tag Groups include:
- PropertyType:
- Example tags using this group:
t/PropertyType.Condo,t/PropertyType.Landed,t/PropertyType.HDB
- Example tags using this group:
- Location:
- Example tags using this group:
t/Location.Bishan,t/Location.Woodlands,t/Location.Sengkang
- Example tags using this group:
- Project:
- Example tags using this group:
t/Project.X,t/Project.Y,t/Project.Z
- Example tags using this group:
Tag Groups are also case-sensitive (e.g., "Client" and "client" are treated differently), and are automatically saved and persist across sessions.